| Previous Post | Top | Next Post |
TOC
This is an deprecated guide. See the newer updated guide.
This is based on the older deprecated guide.
Workstation usability
Let me update note on configuring and administrating my workstation under post-Debian Bookworm (12) GNU/Linux in testing.
This is non-hardware specific notes and tips.
For the hardware specific notes and tips, see:
- Thinkpad T14 Gen 1 –
hostname=goofy - Sony Vaio SVT1313 –
hostname=casperhostname=mickey
System installation
Initial installation by debian-installer
The initial installation by the debian-installer should skip “Desktop environment” task to make it light GUI-less install.
This installs (mostly) packages with Priority: values in required, important and standard.
Initial setup (manual)
I found running following provides convenient work environment for the normal installation. (For the virtual environment installation, you may skip some parts.)
- Use “CTRL-ALT-F?” (
?can be 1-6) to access Linux virtual terminal login prompt, if yor are at GUI prompt. Otherwise, you are already at it.- login to
rootaccount if you set the password forrootduring installation. - login to your primary user account if you didn’t set password for
root, and then executesudo bash -ito login torootaccount using the primary user’s password.
- login to
- Execute
apt-get update && apt-get install aptitude sudo vim mc wget nano- - Add configuration file for personal DEB package repository.
- Set-up user group for UID=1000 user by adding membership to additional groups:
admbackupdialoutdipgamesmailsrcstaffsudo– by adding this, you enable sudo with passwordwww-data
- If passwordless operation is desired, configure
sudoby adding/etc/sudoers.d/passwordlessas:
# No passowrd required for the user in sudo group
# please note the last match wins configuration
%sudo ALL = (ALL:ALL) NOPASSWD: ALL
# No password for 8 hours
#Defaults timestamp_timeout = 480
#Defaults timestamp_type = global
NOTE: Please note that the last matching configuration is active for sudo.
Initial setup (automatic)
Running initial-setup script found at my repository should set up the same as
the above manual case.
NOTE: See Personal DEB package repository for how personal repo is created and used.
Tidy-up package installation status for aptitude.
Since I use aptitude as the primary package maintenance tool, I usually
tidy-up package auto install flags (M) missing for some libraries after the
initial install.
Use of ~i!~M~poptional in l prompt in aptitude to
set library packages as auto-installed. If some of them are not used by other
program, let them remove.
Now you can verify intentionally installed packages with:
$ aptitude search '~i!~M~poptional'
(This intensionally ignores some outdated packages with priority=extra packages.)
Install typical packages
Typically, installing 00-typ and 00-notex task packages from the
personal repo sets up a decent workstation.
Set-up GRUB
In order to probe OSs on other drives, add a following line to
/etc/default/grub:
GRUB_DISABLE_OS_PROBER=false
This is good idea for dual-boot on MBR disk.
But this is not so robust for btrfs.
Multi-boot with GRUB
For more robust multi-boot, I usually add following as /etc/grub.d/40_fixed_linux (The first line should be #!/bin/bash without space. Intentional mistype to avoid missing line):
#!/bin/sh
exec tail -n +3 $0
# This file provides an easy way to add custom menu entries.  Simply type the
# menu entries you want to add after this comment.  Be careful not to change
# the 'exec tail' line above.
menuentry 'Debian GNU/Linux --- main SSD' --class debian --class gnu-linux --class gnu --class os $menuentry_id_option 'gnulinux-fixed-fe3e1db5-6454-46d6-a14c-071208ebe4b1' {
        load_video
        insmod gzio
        if [ x$grub_platform = xxen ]; then insmod xzio; insmod lzopio; fi
        insmod part_gpt
        insmod btrfs
        search --no-floppy --fs-uuid --set=root fe3e1db5-6454-46d6-a14c-071208ebe4b1
        echo    'Loading Linux from /dev/nvme0n1p5 ...'
        linux   /@rootfs/vmlinuz root=UUID=fe3e1db5-6454-46d6-a14c-071208ebe4b1 ro rootflags=subvol=@rootfs  quiet
        echo    'Loading initial ramdisk from /dev/nvme0n1p5 ...'
        initrd  /@rootfs/initrd.img
}
menuentry 'Debian GNU/Linux --- sub SSD' --class debian --class gnu-linux --class gnu --class os $menuentry_id_option 'gnulinux-fixed-51f9cd11-30b3-4d99-b2ed-fe411fa22ee6' {
        load_video
        insmod gzio
        if [ x$grub_platform = xxen ]; then insmod xzio; insmod lzopio; fi
        insmod part_gpt
        insmod btrfs
        search --no-floppy --fs-uuid --set=root 51f9cd11-30b3-4d99-b2ed-fe411fa22ee6
        echo    'Loading Linux from /dev/nvme1n1p1 ...'
        linux   /@rootfs/vmlinuz root=UUID=51f9cd11-30b3-4d99-b2ed-fe411fa22ee6 ro rootflags=subvol=@rootfs  quiet
        echo    'Loading initial ramdisk from /dev/nvme1n1p1 ...'
        initrd  /@rootfs/initrd.img
}
If you have multiple Debian system installed, you should make a backup copy
of /boot/efi/EFI/debian/grub.cfg to protect it gets overridden by installing
the second Debian system.
See https://wiki.debian.org/Btrfs%20migration .
Re-install and UID/GID issues
UID and GID used by some applications are not fixed. So, if you reinstall the exact same packages in a different order, you end up assigning UID and GID for the application.
UID in range between 101-999 such as ones for avahi, saned, colord,
_ssh, … are the most susceptible on this issue.
apt-cacher-ng needs special attention.
EFI-based firmware updates
Install gnome-firmware package and invoke GUI to update firmware on devices
supported by fwupd using Linux Vendor Firmware Service.
Many firmware data can be updated using gnome-firmware.
Workaround for some firmware
Some firmware devices may experience some problem to be updated by
gnome-firmware.
Most notable one on my system was “Lenovo System Firmware”. (I don’t know if this was version dependent or not.) I used vendor’s BIOS update offered as bootable CD and made USB key containing it image data:
If the BIOS options Security > Secure Boot is enabled, it may restrict booting
up from the BIOS Update bootable CD image, you may need to disabled the Secure Boot option to use it.
If Windows 10 or 11 is installed, you may need to reenable Secure Boot after this operation.
Desktop customization
These settings also need to be set again after some major update of GNOME.
GUI Desktop customization
The gnome-tweak package installed as a dependency of gnome package helps to tweak the system.
Although I don’t use this feature, once GNOME Shell integration is installed to the Chrome browser, you can adjust locally installed GNOME extensions via browser from GNOME Extension web site.
Terminal customization
- Use
MONO 14or equivalent (HACK NERD FONT MONO)- Install
*.ttffiles into ``~/.fonts/for a single user or/usr/local/share/fonts/` for system wide installation.
- Install
- Add “080x24”, “080x43”, “127x43”
- Disable “F10”
- Shell as login shell if you want anything other than Bash.
Right mouse click with single button
For Mac or some Sony Vaio with single tap pad button, the following allows proper secondary-click (or even middle-click).
- Tweaks
- -> “Keyboard and Mouse” tab
- -> “Mouse Click Emulation” section
- -> Check on “Area”
Keyboard shortcut customization (GNOME Settings – launcher)
SUPER-C: launch calculatorSUPER-E: launch email clientSUPER-B: launch web browser
Keyboard shortcut customization (GNOME Settings – custom shortcut)
SUPER-\: Open terminal
Name     Terminal
Command  gnome-terminal
Shortcut SUPER-\
(SUPER-\ is easier to type than SUPER-T.)
Keyboard shortcut customization (Input Method)
New better way with GNOME extension
(The older method is recorded in GNOME shell changes.)
- Installed my GNOME extension: Quick switching of input method and touchpad – source
- Log out and log in to GNOME
- Enabled shortcuts from GNOME shell extension preference menu as:
SUPER-SPACE: English (US)SUPER-SHIFT-SPACE: MozcSUPER-CTRL-SPACE: English (international)SUPER-ALT-SPACE: Anthy
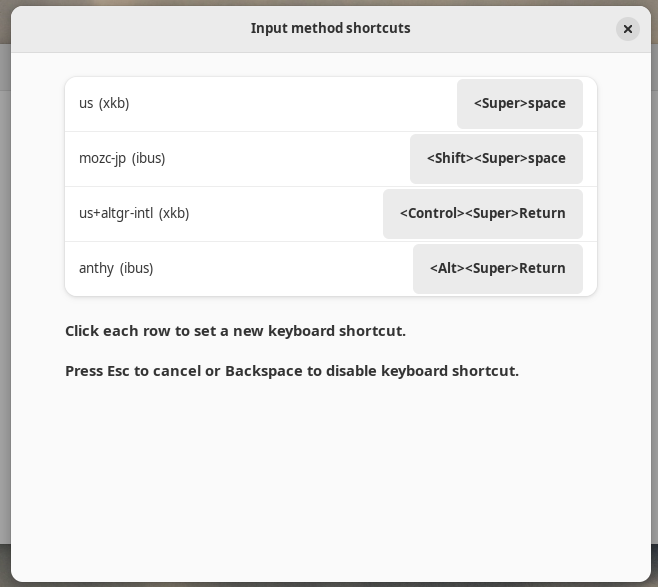
Since I don’t intend to use SUPER-SPACE and SUPER-SHIFT-SPACE shortcuts, I don’t bother to disabled normal SUPER-SPACE and SUPER-SHIFT-SPACE shortcuts in “Settings” -> “Keyboard” -> “Keyboard Shortcuts” -> “Typing”.
For other extensions I use, see GNOME extensions for better UX.
Keyboard shortcut customization (IM)
For Japanese input with US keyboard, set IM (mozc etc.) configuration as:
- On a system where Control-SPACE` is usable (My Thinkpad.)
- SHIFT-SPACE: 全角かな入力 (hiragana mode) 変換キー equivalent (activate IM)
- CTRL-SPACE: 英数半角入力 (latin mode) 無変換キー equivalent (deactivate IM)
- On a system where Control-SPACE` is not usable (My Sony Vaio.)
- SHIFT-SPACE: 漢字 (kanji mode) キー equivalent (toggle IM)
- Set to activate in DirectInput
- Set to deactivate in PreComposition
- SHIFT-SPACE: 漢字 (kanji mode) キー equivalent (toggle IM)
Since Windows-E style Alt-` is grubbed by Gnome Desktop, this can’t be used to toggle IM for Mozc.
See my old Japanese input on US-keyboard (in Japanese) and its Google translation.
Note on non usable shortcut key combos for super
- Any use of
SUPER+modifier+SPACEorSUPER-SPACEbreaks normalSUPER-SPACEfor rotating input method and bad idea SUPER-Pseems to be unresponsiveSUPER-Oseems to be unresponsive
Keyboard shortcut customization (GNOME Tweaks)
For Vim use:
- Click
Keyboard & Mousetab - Click
Keyboard/Overview Shortcut/Additional Layout Optionsbutton - Click to expand
Caps Lock behavior - Enable
Make Caps Lock as additional Esc.
Web browser
Although Chromium exists in the official Debian repository, it lacks account synchronization capability with other devices since 2021. Although there are some workarounds tips posted on web, installing Chrome can solve this situation for sure.
The best solution seems to be adding APT repository by adding
/etc/apt/sources.d/google.sources
in DEB822-STYLE FORMAT and select the google-chrome-stable package.
Mail client
For the GUI access to the remotely hosted IMAP4 mail services, use GNOME Online accounts and Evolution. This approach works for Gmail etc. and compatible with using other devices such as smart phones. Evolution can also be configured to read locally delivered mails to mbox too. (send+receive).
For the command line such as reportbug and daemon programs such as cron to
send mails to external hosts and local accounts, use of exim4 as the locally
installed MTA is good idea. With “sudo dpkg-reconfigure exim4-config”, Select
“mail sent by smarthost; received via SMTP or fetchmail”. Everything else can
be default.
To use Gmail for smarthost, set up “Mail Server configuration” as
“smtp.gmail.com::587”. It is irrelevant for us to worry “Hide local mail name
…” since the smarthost service rewrites it anyway. Edit
/etc/exim4/passwd.client as:
smtp.gmail.com:foo.bar@gmail.com:application_password (You need to create
application_password in advance.)
Whenever I wish to send out mails with “@debian.org” address, I use
ssh+sendmail (created shell script ~/bin/sendmail-p.d.o) to access a Debian
host. (This trick may be usable for any hosts such as salsa.debian.org etc.)
I have mail configuration for:
- Evolution
devscripts(add “BTS_SENDMAIL_COMMAND='/home/osamu/bin/sendmail-p.d.o'” to~/.devscripts)reportbug(add “mta /home/osamu/bin/sendmail-p.d.o” to~/.reportbugrc)
I usually don’t bother with fetchmail these days.
GRUB 2 wallpaper
Place your JPEG wallpaper graphics (JPEG) in /boot/grub/ and run
sudo update-grub or sudo dpkg-reconfigure grub-efi-amd64.
GNOME desktop wallpaper
You can set wallpaper graphics from:
-
Desktop:
Settings->Background -
Desktop:
Tweaks->Appearance->Background -
Lock Screen:
Tweaks->Appearance->Lock Screen -
GDM3: — Not so easy (leave this as is)
Command line
Personal packages
These are my personal packages to help my command line. The source of these are published to my github repo and binary packages are published to my github web page.
- bss: Btrfs Subvolume Snapshot Utility
- https://github.com/osamuaoki/bss
- This helps me with easy backup and snapshot using btrfs.
- osamu-task: Osamu’s Task Packages
- https://github.com/osamuaoki/osamu-task
- 00-cli, 00-dev, 00-doc, 00-gui, 00-jpn, 00-min, 00-notex, 00-typ
- This helps me with installing packages as a group.
- unzip: patched unzip (
-Oand-Ioptions to support encoding of filenames)- https://github.com/osamuaoki/unzip
- provides unzip-i18n
- This replaces Debian unzip program which lacks
-Iand-Ooptions to offer functionality available under other distribution.- Use
unzip -Osjis filename.zipto unzip Japanese zip files.
- Use
Build script is repository.sh.
- Source is cloned first.
- Native packages are build with
debuild - Non-native packages use gbp-style repo and
gbp extract-origis run beforedebuild. repropropublishes build packages to github web pages.
See Personal DEB package repository for the method to publish and their usage
Shell setups
~/binscripts: https://github.com/osamuaoki/osamu-utils (hal,sendmail-p.d.o)- Key dot files in
~/and~/.configare stored in this osamu-utils repo under dot/. - These stored dot-files are updated by
hal conf update - These stored dot-files are restored to active use by
hal conf install
- Key dot files in
- Main
vieditor:nvimwith~/.config/nvim- NeoVim 0.10. See Building Neovim.
- Configuration by forked LazyVim starter in
~.config/nvim. See Re-learning Vim (7).
- Backup
vieditor:vimwith~/.vimrc- Configuration by https://github.com/osamuaoki/dot-vim in
~/.vimrc.
- Configuration by https://github.com/osamuaoki/dot-vim in
Frequent commands to use:
bash: CLI command promptmc: file manager for shellfzf: fuzzy finder for shell and vim.rg: recursive code searchbu: local~/bin/script to backup data to USB drive usingbssas its backend. See Backup and snapshot.
Test accounts
Adding extra user name for /etc/passwd and /etc/shadow with the same
UID=1000 enables to create useful test accounts. Please make sure to create
different home directory for each user name. GDM seems to get confused by this
situation of single UID having multiple user names. So I gave up.
I decided to create accounts, for example u1 accessible by osamu as group, with:
$ sudo adduser --comment "" u1
$ sudo adduser osamu u1
LibreOffice
The version of LibreOffice available on Debian testing environment has some glitches more often than the version available on Debian stable environment. Issues for printing to Hagaki was the killer bug for me.
I find that the installation of LibreOffice Debian packages available from the upstream LibreOffice site on Debian testing environment is the least effort solution for me. For stability, I chose older stable 6.4.7.2-2 version aimed for business deployments (2021/12). This enabled me to print nicely to Hagaki.
| Previous Post | Top | Next Post |