| Previous Post | Top | Next Post |
TOC
AVRチップのISP経由プログラムの練習をします。
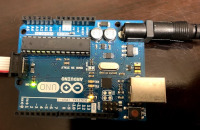
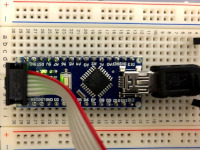
ATmega328P は手元にあったブレッドボードに挿せるArduino Nanoのコンパチボードや本物の Uno等を使ってます。
プロクラマー
これには、 昔TTL-232R-5V を使った自作プロクラマー を使うのも良いのですが、最近Atmel AVR ISP mkIIをただで人からもらったので それを使います。
詳細な使用説明書(英文): AVR ISP mkII User Guide
ソフト環境
Debian GNU/Linux buster=stable 環境です。
$ sudo apt install avrdude
接続
純正のAVRISP mkIIのVCCは電源電圧監視用でAVRISP mkII側からは電源供給されませんので、 別途チップへの電源供給ソースが必要!Unoなら12V、NanoならUSBを必ずつなぐこと。
ちなみに、 昔TTL-232R-5V を使った自作プロクラマー は電源電圧供給していたので便利な面がありました。
実は当方所有のAVRISP mkIIは、USB 電源 とPIN#1 をつないで電源供給ソースとする改造済みです。 このAVRISP mkIIの改造は、この次の記事です。 改造済みだと外部電源供給は不要ですが、電圧設定を間違いなくする必要があります。
さて、ISPケーブルの赤線は1ピン側です。
Uno  Nano
Nano 
AVRISP mkII に赤いLEDがつきっぱなしは、ISPコネクター「差し込み忘れ」です。
AVRISP mkII に赤いLEDが点滅は、ISPコネクター「逆差し」です。
Uno
$ sudo avrdude -c avrisp2 -P usb -p m328p -v

avrdude: Version 6.3-20171130
         Copyright (c) 2000-2005 Brian Dean, http://www.bdmicro.com/
         Copyright (c) 2007-2014 Joerg Wunsch

         System wide configuration file is "/etc/avrdude.conf"
         User configuration file is "/root/.avrduderc"
         User configuration file does not exist or is not a regular file, skipping

         Using Port                    : usb
         Using Programmer              : avrisp2
avrdude: usbdev_open(): Found AVRISP mkII, serno: 000200222425
         AVR Part                      : ATmega328P
         Chip Erase delay              : 9000 us
         PAGEL                         : PD7
         BS2                           : PC2
         RESET disposition             : dedicated
         RETRY pulse                   : SCK
         serial program mode           : yes
         parallel program mode         : yes
         Timeout                       : 200
         StabDelay                     : 100
         CmdexeDelay                   : 25
         SyncLoops                     : 32
         ByteDelay                     : 0
         PollIndex                     : 3
         PollValue                     : 0x53
         Memory Detail                 :

                                  Block Poll               Page                       Polled
           Memory Type Mode Delay Size  Indx Paged  Size   Size #Pages MinW  MaxW   ReadBack
           ----------- ---- ----- ----- ---- ------ ------ ---- ------ ----- ----- ---------
           eeprom        65    20     4    0 no       1024    4      0  3600  3600 0xff 0xff
           flash         65     6   128    0 yes     32768  128    256  4500  4500 0xff 0xff
           lfuse          0     0     0    0 no          1    0      0  4500  4500 0x00 0x00
           hfuse          0     0     0    0 no          1    0      0  4500  4500 0x00 0x00
           efuse          0     0     0    0 no          1    0      0  4500  4500 0x00 0x00
           lock           0     0     0    0 no          1    0      0  4500  4500 0x00 0x00
           calibration    0     0     0    0 no          1    0      0     0     0 0x00 0x00
           signature      0     0     0    0 no          3    0      0     0     0 0x00 0x00

         Programmer Type : STK500V2
         Description     : Atmel AVR ISP mkII
         Programmer Model: AVRISP mkII
         Hardware Version: 1
         Firmware Version Master : 1.24
         Vtarget         : 5.1 V
         SCK period      : 8.00 us

avrdude: AVR device initialized and ready to accept instructions

Reading | ################################################## | 100% 0.00s

avrdude: Device signature = 0x1e950f (probably m328p)
avrdude: safemode: lfuse reads as FF
avrdude: safemode: hfuse reads as DE
avrdude: safemode: efuse reads as FD

avrdude: safemode: lfuse reads as FF
avrdude: safemode: hfuse reads as DE
avrdude: safemode: efuse reads as FD
avrdude: safemode: Fuses OK (E:FD, H:DE, L:FF)

avrdude done.  Thank you.

$ sudo avrdude -c avrisp2 -P usb -p m328p -n -F  -U lfuse:r:-:h -U hfuse:r:-:h -U efuse:r:-

avrdude: AVR device initialized and ready to accept instructions

Reading | ################################################## | 100% 0.00s

avrdude: Device signature = 0x1e950f (probably m328p)
avrdude: reading lfuse memory:

Reading | ################################################## | 100% 0.00s

avrdude: writing output file "<stdout>"
0xff
avrdude: reading hfuse memory:

Reading | ################################################## | 100% 0.00s

avrdude: writing output file "<stdout>"
0xde
avrdude: reading efuse memory:

Reading | ################################################## | 100% 0.00s

avrdude: writing output file "<stdout>"

avrdude: safemode: Fuses OK (E:FD, H:DE, L:FF)

avrdude done.  Thank you.
Nano
ISP ケーブルが、ボード上をUSB向けに伸びるので挿しにくいので注意。
$ sudo avrdude -c avrisp2 -P usb -p m328p -v

avrdude: Version 6.3-20171130
         Copyright (c) 2000-2005 Brian Dean, http://www.bdmicro.com/
         Copyright (c) 2007-2014 Joerg Wunsch

         System wide configuration file is "/etc/avrdude.conf"
         User configuration file is "/root/.avrduderc"
         User configuration file does not exist or is not a regular file, skipping

         Using Port                    : usb
         Using Programmer              : avrisp2
avrdude: usbdev_open(): Found AVRISP mkII, serno: 000200222425
         AVR Part                      : ATmega328P
         Chip Erase delay              : 9000 us
         PAGEL                         : PD7
         BS2                           : PC2
         RESET disposition             : dedicated
         RETRY pulse                   : SCK
         serial program mode           : yes
         parallel program mode         : yes
         Timeout                       : 200
         StabDelay                     : 100
         CmdexeDelay                   : 25
         SyncLoops                     : 32
         ByteDelay                     : 0
         PollIndex                     : 3
         PollValue                     : 0x53
         Memory Detail                 :

                                  Block Poll               Page                       Polled
           Memory Type Mode Delay Size  Indx Paged  Size   Size #Pages MinW  MaxW   ReadBack
           ----------- ---- ----- ----- ---- ------ ------ ---- ------ ----- ----- ---------
           eeprom        65    20     4    0 no       1024    4      0  3600  3600 0xff 0xff
           flash         65     6   128    0 yes     32768  128    256  4500  4500 0xff 0xff
           lfuse          0     0     0    0 no          1    0      0  4500  4500 0x00 0x00
           hfuse          0     0     0    0 no          1    0      0  4500  4500 0x00 0x00
           efuse          0     0     0    0 no          1    0      0  4500  4500 0x00 0x00
           lock           0     0     0    0 no          1    0      0  4500  4500 0x00 0x00
           calibration    0     0     0    0 no          1    0      0     0     0 0x00 0x00
           signature      0     0     0    0 no          3    0      0     0     0 0x00 0x00

         Programmer Type : STK500V2
         Description     : Atmel AVR ISP mkII
         Programmer Model: AVRISP mkII
         Hardware Version: 1
         Firmware Version Master : 1.24
         Vtarget         : 4.8 V
         SCK period      : 8.00 us

avrdude: AVR device initialized and ready to accept instructions

Reading | ################################################## | 100% 0.00s

avrdude: Device signature = 0x1e950f (probably m328p)
avrdude: safemode: lfuse reads as FF
avrdude: safemode: hfuse reads as DA
avrdude: safemode: efuse reads as FD

avrdude: safemode: lfuse reads as FF
avrdude: safemode: hfuse reads as DA
avrdude: safemode: efuse reads as FD
avrdude: safemode: Fuses OK (E:FD, H:DA, L:FF)

avrdude done.  Thank you.

$ sudo avrdude -c avrisp2 -P usb -p m328p -n -F  -U lfuse:r:-:h -U hfuse:r:-:h -U efuse:r:-

avrdude: AVR device initialized and ready to accept instructions

Reading | ################################################## | 100% 0.00s

avrdude: Device signature = 0x1e950f (probably m328p)
avrdude: reading lfuse memory:

Reading | ################################################## | 100% 0.00s

avrdude: writing output file "<stdout>"
0xff
avrdude: reading hfuse memory:

Reading | ################################################## | 100% 0.00s

avrdude: writing output file "<stdout>"
0xda
avrdude: reading efuse memory:

Reading | ################################################## | 100% 0.00s

avrdude: writing output file "<stdout>"

avrdude: safemode: Fuses OK (E:FD, H:DA, L:FF)

avrdude done.  Thank you.
Fuse
なぜかFuseが違います:
- Uno: E:FD, H:DE, L:FF
- SPIEN (Enable Serial programming and Data Downloading) On = 0
- Nano: E:FD, H:DA, L:FF
- SPIEN (Enable Serial programming and Data Downloading) Off = 1
確かNano互換ボードは購入時は特にArduinoとしてチップが初期化されて いなかったので自分で初期化しました。それが良くなかったかも知れないので、 とりあえずNanoのFUSEをISPで修正しました:
 $ sudo avrdude -c avrisp2 -P usb -p m328p -F  \
                -U efuse:w:0xfd:m -U hfuse:w:0xde:m -U lfuse:w:0xff:m
なぜか書き換えられました。
ともに、ブート領域設定をチップデフォルトのBOOTSZ00= 2048ワード(4K BYTE)から BOOTSZ=11 256ワード(512BYTE)に変更されています。どうもちゃんとoptiBootが 入っています。互換ボードの場合最初に自分で書き換える必要があることもあると 覚悟しておきましょう。
Serial AVR chips に基本的な情報を英語で纏めました。
FUSE設定の詳細状況は FUSECALC をみて確認しましょう。
Optiboot プログラムのインストール
シリアルAVRで、ISPプログラマーを使わず、シリアル接続からのプログラムを可能にする Arduino用bootloaderのなかで一番小さな Optiboot インストール法のメモです。
Arduinoとして初期化されていないNano互換ボード等だと購入後この作業が必要です。
Optiboot のアップストリームのソースは https://github.com/Optiboot/optiboot にあります。ここには色々の情報があるので一度見てください。
ただ、bootloaderをチップに焼き込むにはHEXのバイナリーがあれば充分です。
ちなみに、Debian/Ubuntuなら、少々古いソースコードから作られた
パッケージですがarduino-coreパッケージがインストールされていれば
/usr/share/arduino/hardware/arduino/bootloaders/optiboot/optiboot_atmega328.hex/usr/share/arduino/hardware/arduino/avr/bootloaders/optiboot/optiboot_atmega328.hex (Arduino 1.8.19)
にHEXのバイナリーがあります。
ところが、これを使うと:
$ sudo avrdude -p m328p -c avrisp2 -U flash:w:optiboot_atmega328.hex

avrdude: AVR device initialized and ready to accept instructions

Reading | ################################################## | 100% 0.00s

avrdude: Device signature = 0x1e950f (probably m328p)
avrdude: NOTE: "flash" memory has been specified, an erase cycle will be performed
         To disable this feature, specify the -D option.
avrdude: erasing chip
avrdude: reading input file "optiboot_atmega328.hex"
avrdude: input file optiboot_atmega328.hex auto detected as Intel Hex
avrdude: ERROR: address 0x8010 out of range at line 33 of optiboot_atmega328.hex
avrdude: read from file 'optiboot_atmega328.hex' failed

avrdude: safemode: Fuses OK (E:FD, H:DE, L:FF)

avrdude done.  Thank you.
あきらかにbootloaderのサイズが大きくなり収まっていません。bootloaderに合わせてメモリーマップを調節するのも一つですが、ここはちゃんと256word=512byteに収まるブートローダーを入れるのでしょう。 これって、2021年からのバグですね。 使うGCCを古い4.6のから、普通の最新版5.4.0にしたのが関係しているようですね。 道理で、Arduinoをアップグレードしたらbootloader書き込みが動かないのも無理ありません。小さなoptiboot_atmega8.hexを使うと書き込むことは書き込めましたが、これがうごくのかな?
optiboot の githubから、MCUdude/MiniCoreを見つけました。 115200bps、16MHzがあるので、それを使います。(19200bpsだと、何ちゃってARDUINO NANOとの接続が良くなかった)
 $ git clone https://github.com/MCUdude/MiniCore.git
 $ cd MiniCore
 $ cd avr/bootloaders/optiboot_flash/bootloaders/atmega328p/16000000L
 $ avrdude -p m328p -c avrisp2  -U flash:w:optiboot_flash_atmega328p_UART0_115200_16000000L_B5.hex

avrdude: AVR device initialized and ready to accept instructions

Reading | ################################################## | 100% 0.00s

avrdude: Device signature = 0x1e950f (probably m328p)
avrdude: NOTE: "flash" memory has been specified, an erase cycle will be performed
         To disable this feature, specify the -D option.
avrdude: erasing chip
avrdude: reading input file "optiboot_flash_atmega328p_UART0_115200_16000000L_B5.hex"
avrdude: input file optiboot_flash_atmega328p_UART0_115200_16000000L_B5.hex auto detected as Intel Hex
avrdude: writing flash (32768 bytes):

Writing | ################################################## | 100% 0.00s

avrdude: 32768 bytes of flash written
avrdude: verifying flash memory against optiboot_flash_atmega328p_UART0_115200_16000000L_B5.hex:
avrdude: load data flash data from input file optiboot_flash_atmega328p_UART0_115200_16000000L_B5.hex:
avrdude: input file optiboot_flash_atmega328p_UART0_115200_16000000L_B5.hex auto detected as Intel Hex
avrdude: input file optiboot_flash_atmega328p_UART0_115200_16000000L_B5.hex contains 32768 bytes
avrdude: reading on-chip flash data:

Reading | ################################################## | 100% 0.00s

avrdude: verifying ...
avrdude: 32768 bytes of flash verified

avrdude: safemode: Fuses OK (E:FD, H:DE, L:FF)

avrdude done.  Thank you.
まあこれで原状回復です。
FUSE設定は fusecalc を見て下さい。以下の記事も参考にして下さい。
TIP: LOCK FUSEの設定値は、単純に考えると0x3F=0b00111111です。ただ未使用ビット の6,7-bitは、読むと1を返すので書き込み内容確認が成立する0xFF=0b11111111を設定値 にします。
| Previous Post | Top | Next Post |